free patterns and tutorial

Tuesday, 13 August 2013

tricks of the trade: mitre a folded hem~


This is my favourite method of finishing hems on fine or drapy fabrics.  It gives a quality finish inside and out, with no ugly overlocking to be seen.  Occasionally it is necessary to hem a corner of fabric, and following are step-by-step instructions on how to neatly mitre the corner. 

Lay your corner that you wish to mitre on your table right side up, then fold it diagonally right sides together so that the cut edges meet.
Fold the upper raw edge towards the wrong side (towards you) 5mm, and fold the lower raw edge towards the wrong side (away from you) by the same amount.
Now stitch the mitre, from the hem edges that you have just folded, to the initial diagonal fold.  It is important that you stitch perpendicular to this diagonal fold.
You will have stitched through four layers of the hem allowance.  To reduce bulk in the corner, trim the excess seam allowance away diagonally, to within 2mm of your stitching.
Finger press your tiny seam allowance open, and turn hem through to the wrong side.  It should now look like this:
Repeat this for all corners that you need to mitre.  It is best not to press your corner until after the hem is sewn.  Start sewing your double folded hem, and as you approach the corner ensure your mitre sits flat and square.
Stitch to the inside corner of the mitre, I use my handwheel to ensure the needle is placed in the exact spot.  With the needle down, raise the presser foot and spin your work 90 degrees to continue the hem, ensuring the corner lays flat and square.
Once your hem is completed you can give it a press.
Voila!  Perfect corners - beautiful on the outside and the inside!
I hope you find this useful, and if there are any questions I will answer in the comments.  Happy sewing!

Pretty Piping


I'm a big fan of using piping as a trim on garments, and my current favourite place is to sew it into the waistline of a dress:

piping at the waistline of my Aurora Dress

Piping at the waistline of my 1950's Red Spot Dress

Gail asked if I had done a tutorial on this, right before I was about to put piping at the waistline of my red tartan dress - so here goes!

You can buy piping ready-made, but it is usually fairly cheap polyester/cotton or polyester satin stuff:


or you can buy piping cord and cover it yourself:


or do what I did - stash bust and take the cord out of some old piping you no longer want!

Next you need to cut bias strips to cover your piping cord.  I'm using self-fabric, and have marked a line 45degrees to the selvedge.  You will need a strip about 3cm wide and slightly longer than your waistline - I just plonk my ruler in place and chalk around that because it is quick and easy:


I cut this out, then remembered I was using a checked fabric, lol!  I recut the strip at the same angle as the line in the left corner, so that it passes through the same part of the check pattern along it's length  (most checks aren't actually squares, but are rectangular, so you need to cut slightly off the true bias to get this effect).

To sew up your piping you'll need a zip foot on your machine:


Wrap the fabric around the cord, right side facing out, and stitch as close as you can to the piping cord:


Voila - pretty piping!


Because I'm an accuracy nerd, I don't sew the piping into the waistline willy-nilly, but measure it against my pattern for an accurate measurement.  Chalk the piping at the CB, darts, seams and CF, remembering to skip the dart intake and seam allowances:


Now you can sew your piping to the bodice.  Stitch along the same path as the piping stitching, and match those chalk marks to the relevant seams:


Have a wee moment of admiration:


Then sew the bodice to the skirt - stitch with the bodice on top, so you can sew in the line of the previous stitching:


I usually overlock the seam allowance and turn it upwards.  Sometimes I add ribbon to it, like in the Red Spot Dress above, but this dress is having lining so that would be a waste of time! 


Nice eh?  I'm so glad I recut the binding, it was worthwhile to get it all symmetrical like this.  When it comes to checks, I am definitely a matchy-matchy person!  (by the way, I'm still working on my check-matching post - it keeps getting bigger.....)

There are so many fun things you can do with piping - edging collars and cuffs, accenting style lines, etc - and I think covering your own always looks classy.  It could be self fabric, a contrast colour, or a texture contrast like satin.  Whatever you choose, piping is simple and effective.  Are you a piping fan too?

Knot buttons a tutorial


I made knotted buttons of self fabric for my Kelly-green cardi; and Gail asked for a how-to... well I had taken a few photos while I was making them but had sorta decided against posting a lengthy series of pictures in that post because I thought people might find it not interesting; so thank you Gail, for asking!
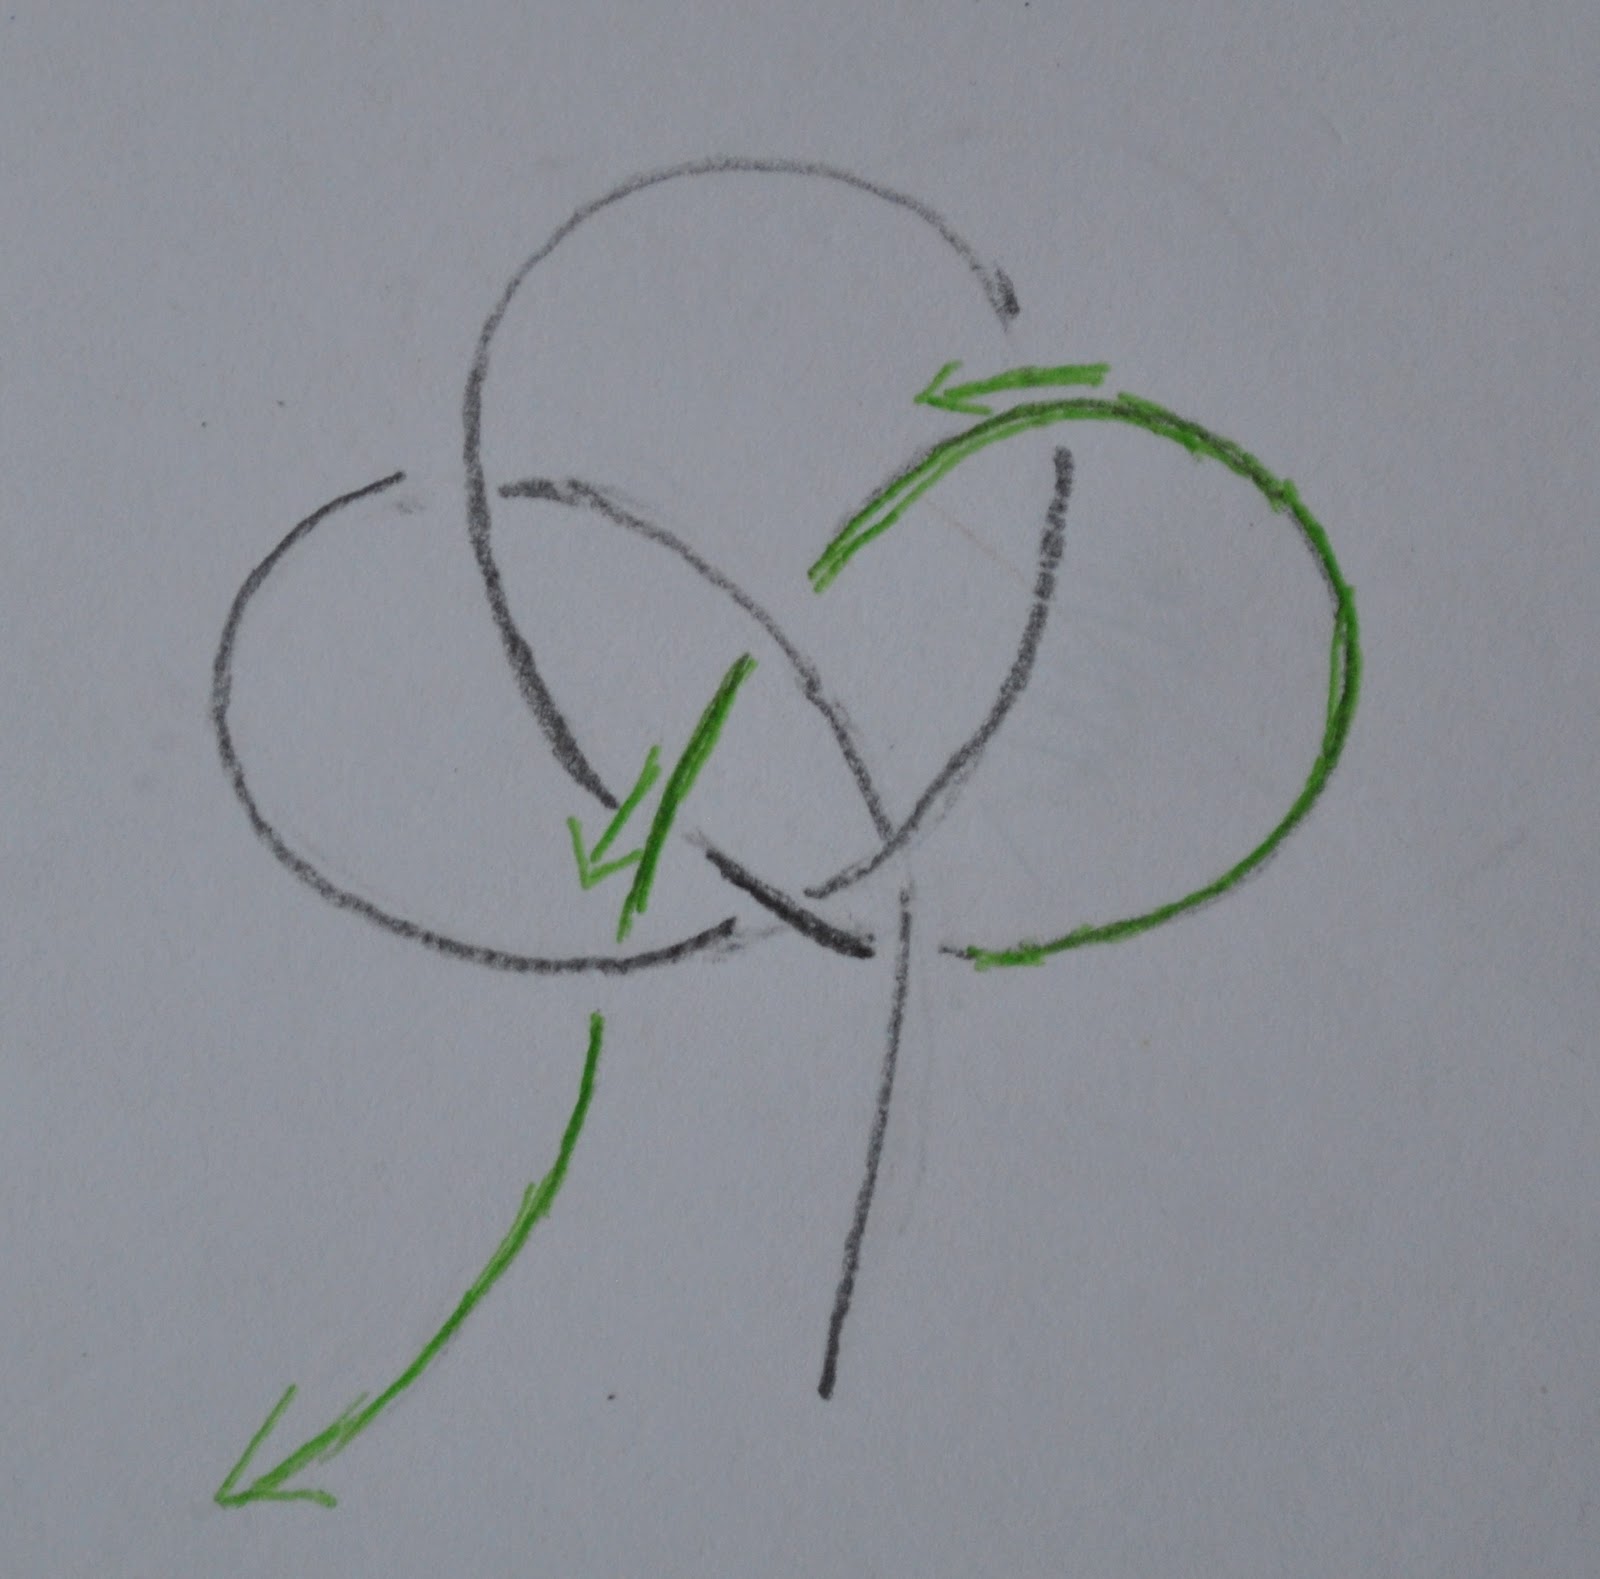
I saw this knot in a Vogue pattern (1107) and even though the Vogue instruction sheet has a nice computer-drawn set of diagrams, a lot cleaner and neater than my efforts here; I have re-drawn them because I'm not sure whether for me to photograph even one step from the Vogue pattern instruction sheet and put it here is trampling copyright (does anyone know??)  But just in case I am not going to even go there....!!  But I can't see how a knot is "owned" by anyone so I did my own drawings and instructions and I hope they are clear enough.  It is not a particularly difficult knot.
Firstly I made two long spaghetti tubes of the fabric.  You make these by folding a 2.5cm (1") x (roughly) 25cm (10") long rectangle right sides together and sewing along one long edge in a narrow 6mm (1/4") seam, cutting the two machine threads to be nice and long long long.  Trim the seam allowances of the tube and thread those long tail threads into a needle; and feed back through the tube to turn right side out (with the blunt end of the needle leading, for obvious reasons!)  to make a long narrow cord for knotting.
Now for the knot...
(Note: in each step; the new instruction is in bright green, with the previously executed steps in grey.)
Firstly hold the cord with your left hand with a short tail and loop the end over itself and to the right...
Then loop the long end back over the first loop again and under the first junction...
Thirdly; take that long end and weave it through the four loops of cord created in the first two steps; first over, then under, then over, and finally under and out...
Gradually tease closed and tighten the loops of the knot together to be a nice, firmly and evenly arranged knot.
One at a time, cut the ends, turn under and slipstitch the ends neatly and invisibly on the underneath of the knot.
Voila! C'est fini!

Monday, 5 August 2013

size information


note : the following information is for reference only . please contact the seller to get the detailed information .
commodity Sizesuggest hip / cmskirt longhipkummelsskirt
32100 - 10438.186.576.391.5
34105 - 10938.191.581.496.6
36110 - 11439.496.686.5101.7
38115 - 11939.4101.791.5106.8
40120 - 12540.6106.896.6112
42126 - 13140.6112101.7117
product indexproduct design
thickness indexelastic indexsoft indexdress lengthmodeling
thinnone bombmoderateshort designtight
Hot selling fat size woman pasin elastic fashion wrap dress all-match short skirt for summer FREE SHIPPING

Sunday, 14 July 2013

What kind of dress would hide my big tummy?


Undergarments are a girls best friend! 
seriously, find a good shapewear, it will smooth everything out and even bring you down a size. The one I've found and love has a build in (strapless) push up bra, and then goes all the way down to mid thigh. So I don't need to wear a slip or bra, just my shapewear. 

Shape of the dress is key! 
if you want to hide you tummy, make sure your dress has a shape, if its a straight dress on a curvy body the dress will hug your curves, and probably not in the way you wanted. So pick a dress that narrows in at the smallest part of you torso. And then flairs out at the waist. 

Distract they "eye"! 
Even though you don't think you have a big chest, fake it. Get a push up bra, or one that just looks really great on you. Then choose a dress with a V-neck. (if you feel the V is a little too deep, just use a safety pin on the inside to bring it up an inch) By showing off with a V-neck your elongating the neck and making drawing the attention away from your middle. 

Add Bling! 
Even if it isn't big bling, make sure to wear a necklace, earrings, bracelets. Necklaces and earrings help with the idea of bring the "eye" up, just like the V-neck. Plus if you have cute jewelry more people with be looking at that, then your curves. 

Show some skin! 
If your like me might not like showing off you arms, but I am fine with my legs, so I always wear a short formal jacket with my dresses. But I make sure to get a dress that ends right around my knees. Because I'm really short, having a shorter dress and showing off my legs actually makes me look taller, along with wearing heels ;) But if you don't like your legs, and feel comfortable with your arms, pick a longer dress that's a halter top or sleeveless. 

Phew, lol Those are the biggest things I can think of :D I hope that helps you a bit!

Ok so here is a great example of my favorite style dress! 

 dress1

The sash type fabric at the waist, makes her look smaller by faking a little waist. 
The V-neck makes her torso look taller and thinner. 
See how the dress has lots of fabric bunched at the waist and then flows out and away, that hides the tummy. 
And the length is perfect! Just above the knee, makes her look taller which in turn makes her look thinner and shows off her legs, and takes away from the belly. Which is what its all about! lol :D If she had on some great bracelets and a necklace, she'd be set! 


Dresses that looks a bit wrapped around the bust will make your chest look bigger and take attention away from your stomach. 
I have a really pretty rose print dress from Talbots that made me look a full dress size smaller for my older brother's wedding.


Empire line, any dress with the waist right under the boobs. Then large flared skirts. Also surprisingly pencil skirts if well fitted. The curvy shape is good for them, it just tends to be that we buy the wrong sizes.


I know people that have this problem, and something easy to do is wear the elastiband skirts that go obove your waist. If the dress is full (or skirt) Your tummy won't even be noticed:)

Peplum tops are good as well.

Wednesday, 27 March 2013

collar

http://www.youtube.com/watch?v=uK3tLUnzmFY

<iframe width="420" height="315" src="http://www.youtube.com/embed/uK3tLUnzmFY" frameborder="0" allowfullscreen></iframe>

1)Interface the collar and the facing and the garment about an inch and a half from the center front into the shirt, where the buttons and buttonholes will go. Be sure that all notches, match points, shoulder points and center-back points are all marked properly to facilitate pinning and sewing.
2) stitch the collar together, clip corners, turn and press. leave the edge that attaches to the neck open and unfinished. If you want to add top stitching or any decorative elements to the collar, do so now, being sure they won't interfere with sewing the collar into the garment. 
3)stay stitch the garment along the neck edge seam line including the facings. clip the raw edge right up to the stay stitching. Some modern instructions say clip the curve then stitch. DON"T DO THAT! Do it the old fashioned way, stitch then clip. The stitching and clipping will allow the neck edge to straighten out when pinning the the collar and when being sewn.
4)pin the collar against the right side of the garment along the neck-edge, being sure to match all match points, shoulder center back etc. baste in place.
5)fold the facings and pin along the neck edge wrong sides together with the collar sandwiched between the garment and facing. Press the facing front edge from the collar right down to the hem and pin it in place This extra step will ensure that the facing is in the correct place and not skewed, which is easy for a beginner to do,
6) stitch the neck edge sandwich together, garment, collar and facing all in one. Grade and trim the seam allowances or use the serger to overlock the edges for a clean, professional finish. Clip the corners, turn and press.
7) voilà! A finished collar, facing, front edge and neckline! Stitch the facing to the collar to hold in in place, stitch from the right side in the shoulder seam. This is called "stitch in the ditch and it will make the sewing invisible. If you want a sporty look, top stitch the collar and the front edge. If you want a decorative edge, top-stitch using decorative thread.